How to Start a Blog in 2023 (7 Steps Guide)

Do you also get stuck while reading a long monotonous blog on “how to start a blog”? Hang in there!
Jump to 7 Quick Steps to Start a Blog in 2023
If you are here, must you be looking for the perfect step-by-step guide to kick off your blogging career? If so, you’re in luck!
Here, I have provided all the insight and strategies a beginner must know to start a blog. I have made this guide super easy, so anyone with a basic understanding of technology can get onto blogging.
This beginner-friendly tutorial will show you each detail to start a blog with images to clarify every step! Which will instruct you to launch your first successful monetized blog in just an hour.
If you have any queries? Hit me up at the contact me. Let’s hop on!
I’d love to assist you in starting your first ever fully monetized blog.
Why Should You Start a Blog?
There is a myth that you need to be a great writer to be a successful blogger. You must have heard the word “Passion” that everybody uses. Let’s explore it a bit further.
Once you start, you need to get over the initial hurdles. You can’t learn blogging in a day; there’s a lot to learn. You make mistakes and take lessons from them..
The blogging world is just big as you can imagine. Blogging could be difficult for you if you’re doing it the first time, and the only thing which keeps you persisting throughout the process is passion.
Reasons that you can consider why should you start blogging are below:
- You can make a living online; you must have heard that blogging is a passive income. Yes, it is. Obviously, you can’t earn that high amount at the start, but if you do things correctly, sooner or later, you’ll be able to reach that amount.
- You can find a community and can meet a lot of people online. People start recognizing you through your emails, interaction in a comment, or on social platforms. You’re going to have an identity and confidence in your life.
- You’re able to learn a skill; same as everything, writing and blogging get improved with time. Whether you write a blog post, an email, a resume, or the statistics pages, practice can make you an expert in that.
Start Your Blog in Simple 7 Steps
Here, I’ll help you to understand the nuance of blogging. First thing first, I’ll introduce you to a quick start tutorial. Keep in mind that this is a glimpse of the whole post; everything is covered in more detail below.
The initial step to start a blog is to sign up at Hostinger for a $3.99/month plan with the free domain and WordPress optimization.
Follow the entire tutorial to set up your blog through Hostinger and WordPress blogging software in just an hour.
Finally, you’re up for your blogging. Optimize your blog using WordPress plugins to boost the SEO of your blog.
Blog posts are meant to drive traffic to your blog. Let’s dig further to create your first-ever blog post and keep the momentum going.
Lastly, when your blog starts getting enough traffic, you can monetize it and make money from different monetization methods.
7 Quick Steps to Start a Blog in 2023
Here’s a sheet that outlines the seven major steps to start a blog:
Now, you hold an idea of how to create a blog. Let’s start it explicitly!
If you’re already clear about your blog’s topic, you can skip 2 minutes of the post to get straight to the start blog.
We urge you read the whole post to avoid missing the important details a newbie must learn.
Step 1: Deciding your blog topic and name
Deciding your blog topic
The first and most important step is finding out what you’re going to blog about?
Yess! Niche is generally a topic you’re focusing on and going to start your blogging on. At the same time, the name of your blog comprehends people about your topic even before clicking on it.
Choosing the right blogging niche is a gamechanger for your blogging career. Take your time and evaluate different ideas that attract the reader the most; what’s in the market? And is it an evergreen topic? And will this niche catch the traffic forever?
That’s something you need to brainstorm!
The essential step while choosing the blog topic is to ask yourself some questions: whether this niche is profitable or not? Or will you be able to rank on that particular niche’s keywords? Below are the ideas you can consider for your blog topic.
1. The knowledge you want to share
Blogging about the knowledge you already have could be the way to go.
Think about your knowledge or experience; it could be anything; you may be an experienced web designer who can help a newbie, or maybe you’re a public speaker who can share your valuable experience there.
For Example, in one of our blogs, “All PHP Tricks,” we share our immense knowledge about PHP. Your chances of ranking increase when you are dedicated to identifying customer needs and delivering effective solutions to all problems.
2. Something you want to learn
Things you like to learn are an alternate option. For instance, are you concerned about making money? All are! Many bloggers started their career in the money-making niche with zero experience, and it’s crazy how they are now making over six figures a month from the same blog.
Similarly, some successful bloggers, at the outset, choose the blogging niche, providing all the technical information in a simplified form to help people start a blog successfully, though they had the same goal. They are now considered experts in this niche and earn a huge revenue monthly.
3. A personal blog
I saw many bloggers sharing their life/thoughts/experiences with the world. They have built their audience and share what they like to do. For that, they don’t have to stick to one topic. A variety of topics are available in this niche.
Travel blogs are personal blogs. Travel bloggers are intent on sharing their traveling details; hence, other concerns may know about the place, areas to visit, destination guidance, etc. They build their audience and make decent money.
Still not sure? Here are some tips you can consider reaching your blogging topic.
Am I doing what I enjoy?
Working consistently with full potential on things you don’t like is quite difficult.
If you do what you don’t enjoy, it’ll be shown in your work soon. This will affect the consistent creation of your work and your audience’s attention.
Choose the topic you enjoy learning about. Your interest in your blog topic builds curiosity when you work, which ultimately results in genuineness.
Bear in mind: You can consider this question, but in most cases, it’s not true. Most bloggers have blogs generating massive revenue, which has nothing to do with their interests or what they do in general life. They find a profitable niche and just wing it.
Check public interest in your niche?
Blogging is always for the audience if you want to make money from it! Otherwise, the topic could be anything.
You must choose the niche that is considered a money-making niche, and a niche is profitable in only one sense when it catches the right amount of traffic.
First, get a sight of your interest and search for your ideal topic on Google and check out the results.

See, there is a huge competition and a high amount of public searching for it.
We prefer to choose a high search volume. The competition could be low but not too much because no competition means the topic is redundant, and no one is searching for that topic at all.
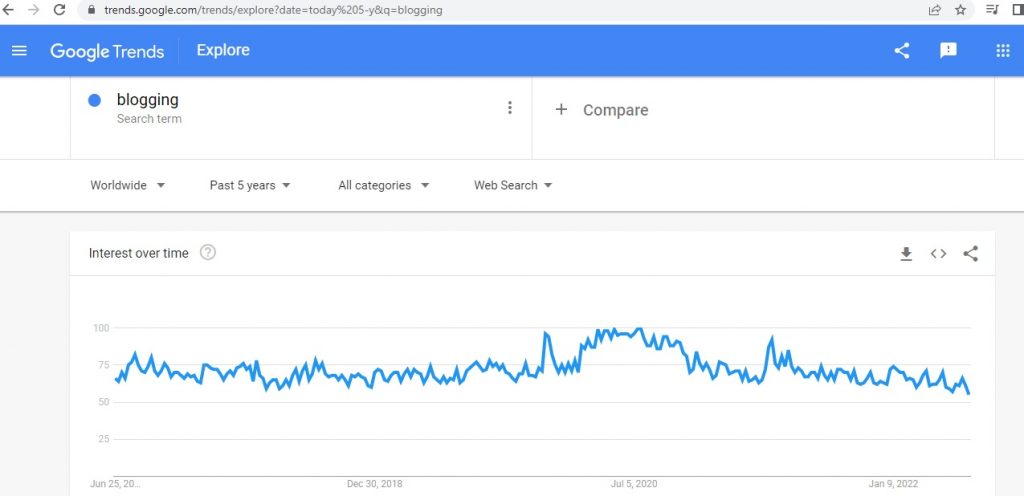
Google trends show the trend or popularity of the topic through search results in percentage. The above result shows that the “Blogging” niche is evergreen; the slope does not go too down or high, and It’s a continuous trend.
I’ve seen so many beginners choosing the wrong topic to start blogging.
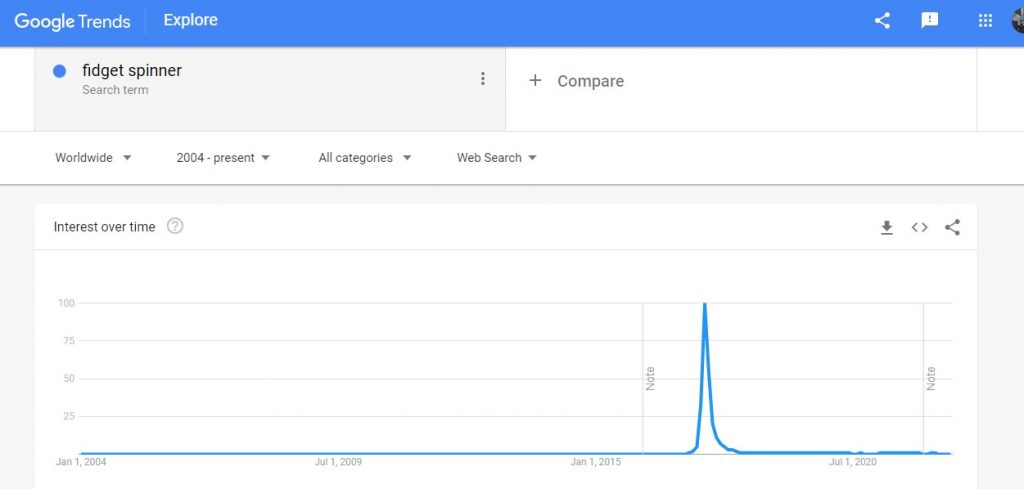
This image shows that this topic was a short-term trend; you should avoid choosing topics that are new in trend because they can fall downwards at any time.
If you choose a niche that is not strategically right? All the time, investment, and energy you’d put into your blog could be wasted!
Invest your energy and money in the right spot!
Deciding your blog name
Hope! Now you’re sure about your blog topic.
It’s time to name your brand. Yes, “your brand” sounds exciting? Right! But don’t get too excited; you’d require much effort to make your blog name a brand.
It’s possible! A lot of people have done this before.
Take a note, write down all the suitable names, and brainstorm for at least 15 minutes until you come up with something good.
Bring to light the ideas!
When you’re done with it, make the match between different phrases to find out the perfect blog name. A recommendation is not to go with a complex blog name so that people can quickly understand your blog.
The domain name is your website address. The domain is the place where your blog name gets registered. Let’s look at our blog domain name, www.allphptricks.com, which clearly shows the blog is about PHP tricks.
When you’re done with your blog name, check the availability of your blog name as a domain here: https://www.hostinger.com/domain-checker.
Below are some essential tips to follow when getting a domain name.
- If you cannot find your ideal name with the .com, you can use alternatives such as .net and .blog. But we advise you to prefer the .com version!
- You cannot use any commas or punctuation except dashes.
- Avoid the use of numbers, hyphens, and similar-sounding words.
- Make it as simple as possible so that people can easily remember it.
- If you are not certain you will keep this blog for a lifetime or would sell it when offered a handsome amount, choose a different name.
Many bloggers use their names, which restricts them from selling their blogs. Choosing a different name helps you market your blog afterward.
Still confused? Try out themeisle.com, the blog naming tool, to find your ideal blog name.
Once you find your domain name, don’t hurry to buy it; Add it to the cart. We’ll show you how to get a domain for free through Hostinger.
Step 2: Get a domain and web hosting from Hostinger.
Finally! When you’re finished with a blog name, it’s time to work on getting your blog online. Keep an eye out for every step.
Two things that are essential to getting your blog run:
- blog hosting (also referred to as web hosting) I recommend Hostinger
- blogging software
You must need a blog host to own your blog. Blog hosting is a company that provides web server space and equipment which helps your blog to live online. It stores all your blog files, data, and website code in a server and shows it to the user’s when they search your blog name. In short, it makes your blog accessible to the public.
Blogging Software is the second important thing you need to start your blog. In this article, I’ll make a blog through the hosting web package with a WordPress software company because it is easy to use with the spark of creative freedom.
Why not a Free blogging platform?
Serious bloggers always prefer a self-hosted blogging platform for credibility and creative freedom.
There are numerous free blogging platforms, such as Blogger.com or Tumblr.com, or WordPress.com, but as they are free, there will be multiple restrictions.
Take a quick look at the limitation so that you may understand:
- A free blog does not give you complete control of your blog; you cannot entirely monetize it.
- Your blog name will be placed as a subdomain in the URL. For instance: blogname.blogspot.com. It looks ugly or not credible! Right?
You must avoid free blogging platforms, so you are up for serious business purposes!
Get Your Blog lives on Internet through Hostinger
The web-hosting I recommend is Hostinger. This tutorial will guide you on how to make a blog through Hostinger. It sounds difficult; it does! But this guide will help you learn to create a blog in just 60 minutes.
Let’s move on. The first step is to get straight to Hostinger.com, select your plan and register your domain which comes free with a package.
Get Domain & Hosting from Hostinger!
It comes with 30-Day Money-Back Guarantee, so it is risk free, try it out now.
There are different plans to get started; you need to select the WordPress Starter Web Hosting plan, which costs $3.99/month and includes a free domain. It’s a complete package to get started with WordPress optimization.
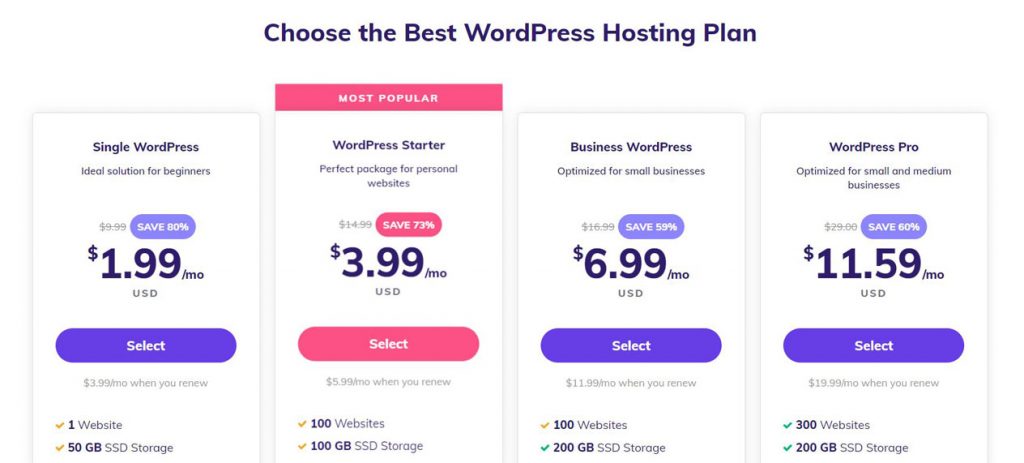
Click on the Select button to get on the track. Create an account and fill out the payment details on the registration page.
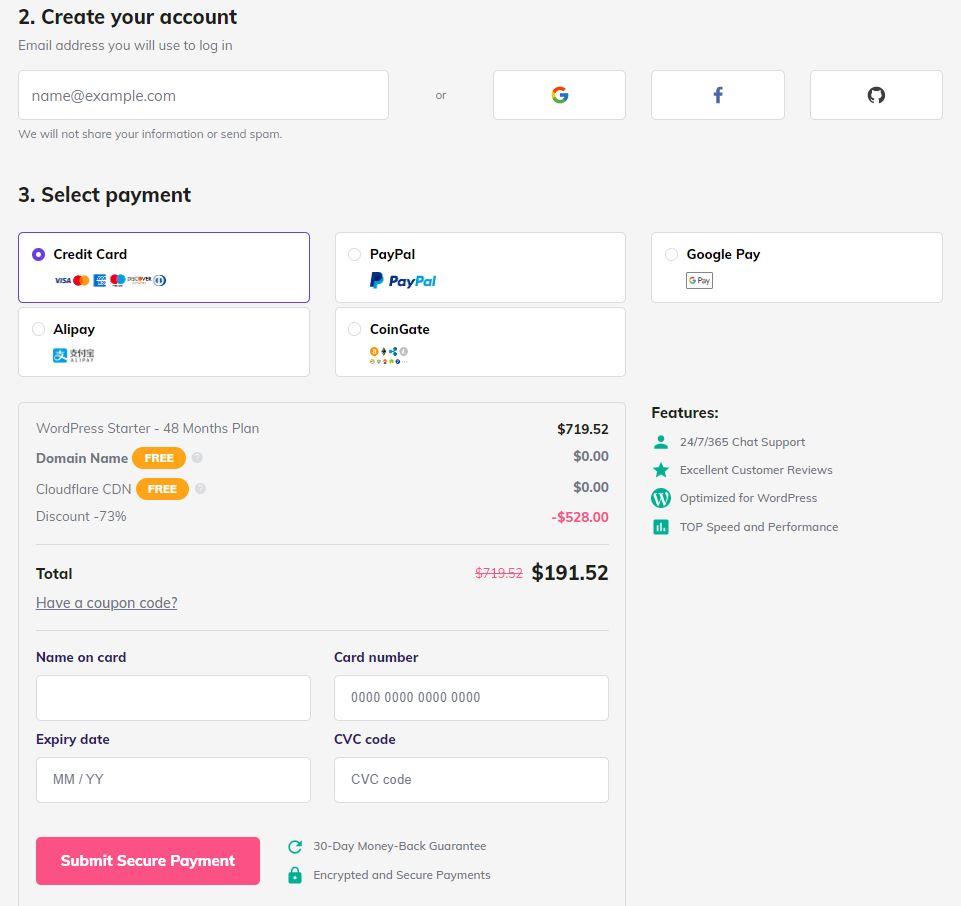
Once you’re done with the payment details, you’ll be moved towards the next page, which is the Hostinger’s hPanel which will lead you throughout the procedure.
First, When the hPanel asks you to whom you’re creating a blog, you must click on “Myself.”
After that, select “A blog” to let the wizard know you’re making a blog for which you’re here.
Lastly, the wizard will ask you about your experience in creating a website so that it will guide you according to your need. In this step, you might choose one between the two options on the right. It’s entirely up to you according to your experience.
Select the WordPress Blogging Software
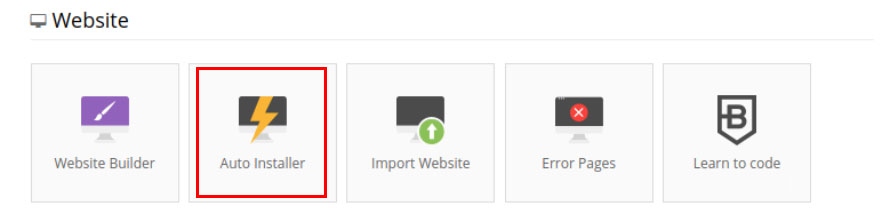
Lets install WordPress using an auto installer, head to Website -> Auto Installer.
On the next screen, you’ll tell the wizard about the Platform aka CMS; you want to use to create your website.
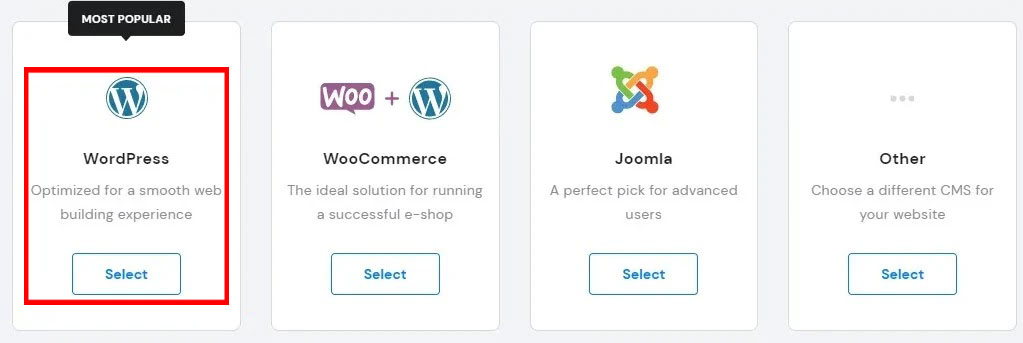
I recommend you build your blog with the WordPress self-hosted CMS.

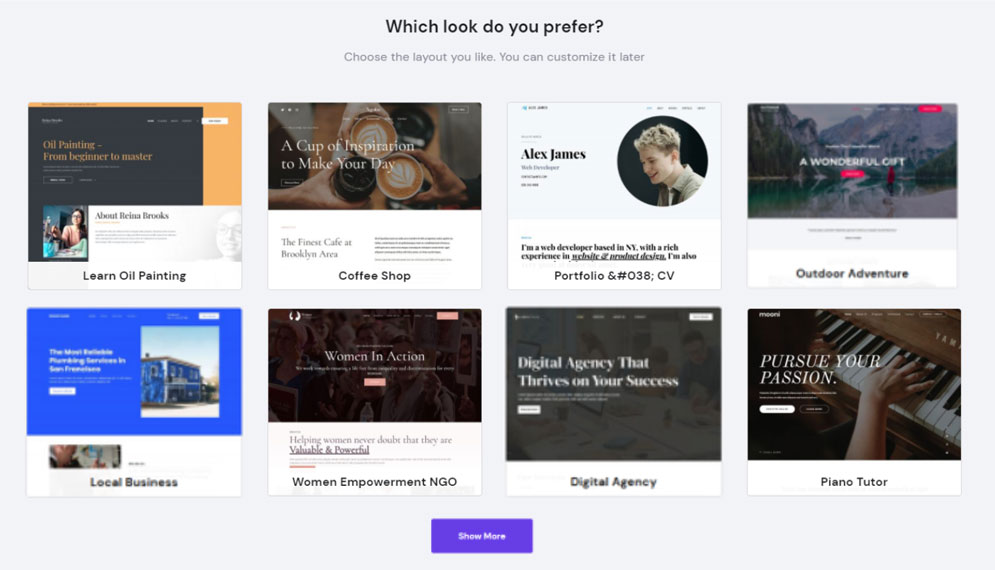
Enter your email and password to create your WordPress admin credentials. Once you’ve chosen WordPress software, it’s time to decide on the template to start your blog on. There are all fascinatedly design themes which you can choose from, or you can also explore that purple button, “Show More.”
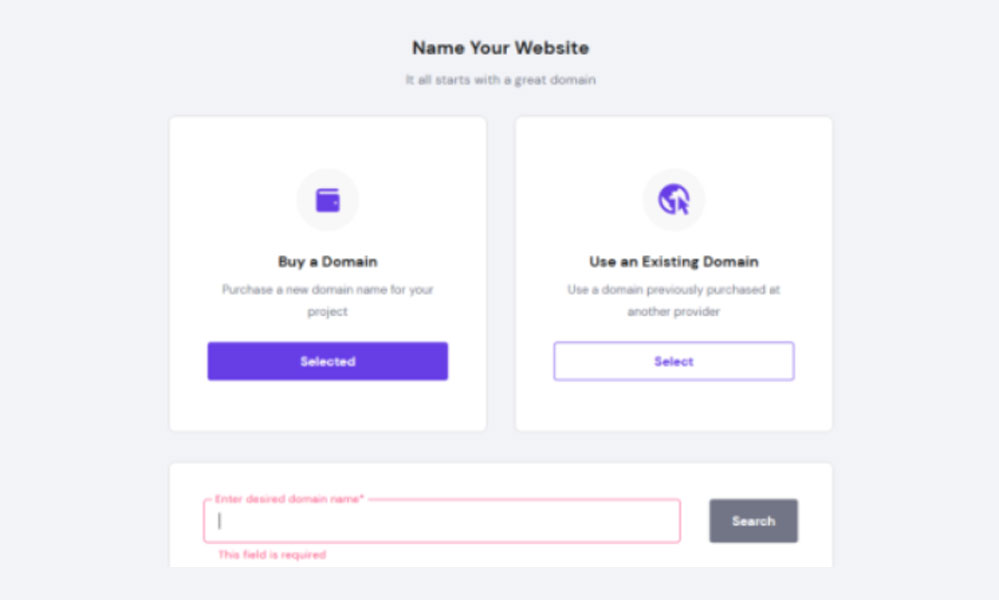
In the long run, there is a step you must be waiting for! Owning your domain name.
You’ll be able to buy your domain, or you can enter your previous one to connect with the website. This Step is going to be super easy because you have already covered step 01.
Click on the Select button on the box to “Buy a Domain.” Then enter your preferred domain name in the search bar given below.
So, you’ve already checked the availability of your blog name as a domain. Now, you need to select the available domain and turn on WHOIS privacy for $10/ year.
WHOIS privacy is assistance that keeps your private information secure so that nobody can access your personal details and does automated backups.
Domain privacy protects your contact information, so you’ll be safe from scam calls and email.
You need to pay for the service, but it is worth buying.
Great! You’ve covered the essential phase.
Lastly, Hostinger will take a few minutes to finish setting up your blog.
Step 3: Know your WordPress (Blogging Software)
Do you know the popularity of your Blogging-Software WordPress?
Blogging Software is necessary for a blog. Our reason for advocating WordPress is that it’s free, easy to use, and contains many blogs’ management tools and features.
WordPress is the largest platform covering over one-third of the internet as a self-hosted platform. 40% of bloggers use WordPress to run their blog.
If you pick blogging Software other than WordPress, it will be costly. WordPress offers plenty of plugins for modifying your blog in different aspects.
Hostinger does WordPress installation during the setup process. You don’t need to go the extra mile for it. It’s as simple as it could be! Finally, when the Hostinger setting up is finished, you will be taken to the next screen given below. That’s how it looks!
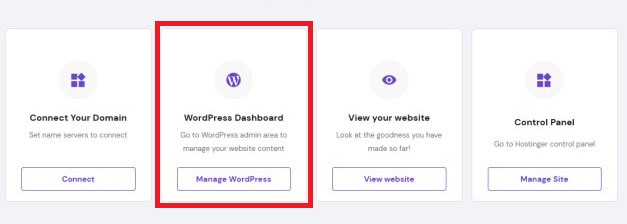
Press the “Manage WordPress” button next to the connect option. You will be redirected to that area in hPanel.
When you scroll down, you will see an option on the right of your latest installed “WordPress Version.”
There is also an option for the user’s ease if they find any issue with their installed WordPress.
You can reinstall WordPress by clicking on the “Install” on the install another WordPress option, located at the bottom of the screen.
Step 4: Design your self-hosted WordPress Blog through Theme
In a visual look, your blog is primarily designed through themes. In the blogging market, themes are the available pre-made design templates for your blog.
To start out your WordPress blog’s first look would be like this:
Choosing a proper theme is essential for your blog’s monetization. Your blog’s theme ought to match your domain of content.
You must not buy a paid WordPress theme immediately. You can go with the premium when your blogging starts generating revenues.
WordPress offers a myriad of themes for free. Some themes are highly glamorous, and the charm might stupefy you, and you could choose a complex theme that might not match your blog’s needs.
Take into consideration that you could swap your theme anytime. Don’t stress over the hotsy-totsy theme; just choose the right one. You can’t learn blogging in a day; you evaluate some things with time; this similarly goes with the theme.
Check these 6 best free WordPress blog themes you must use.
Apply the Theme
As you’re following my tutorial, let’s apply the theme!
Initially, you need to log into your WordPress admin, which you can access by typing [yourdomain].com/wp-admin; it means you need to add the /wp-admin prefix to the end of your web address before searching.
You’ll see WordPress admin; enter your login details.
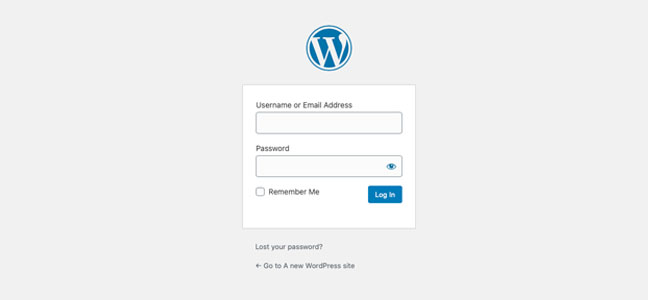
You’re now on your WordPress dashboard, where you see many options such as posts, pages, plugins, and whatnot.
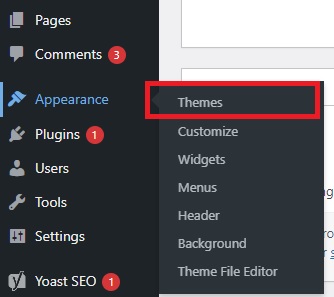
It looks complicated, right? But you’ll get everything by the time. There you may see an appearance option; take your cursor on that and hold a little while, and a menu will appear in the sidebar, where you need to click on the themes from the list.
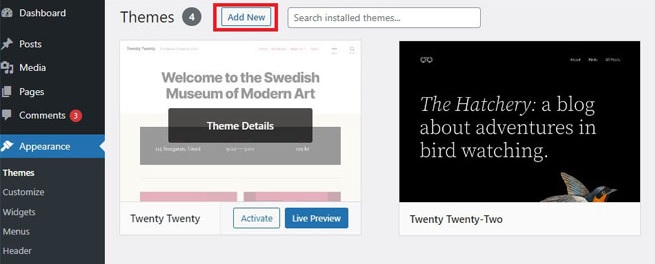
WordPress offers many handy and all-set themes, but we’ll search for fleshier premium themes that will attract the eyes.
You require to click on the add new bottom at the top.
It goes like this: Appearance -> Themes -> Add New Theme.
Now you’ll take to thousands of WordPress themes, and you can choose the best theme for you. Everybody’s tastes are different. On that page, WordPress gives an option of a feature filter so that you can apply it to meet your desired theme.
You’ll need to closely examine all three categories: layout, features, and subject. Choose the options from the respective categories to reflect your blog’s niche and features that you feel you’ll need for your blog.
Filter the Themes
Below is a glance at the filters:
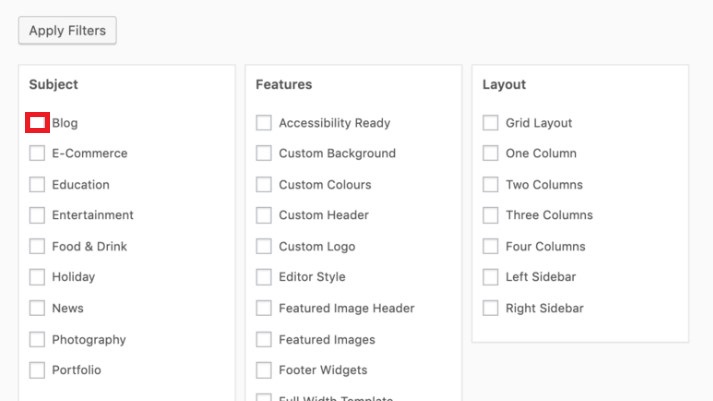
When you apply the filter, the fascination theme will appear to get them installed.
WordPress provides the possibility to have a preview of your blog with just one click on the thumbnail.
Once you find a suitable theme that you think will help boost your website’s performance, you can install it.
When the system is done with the installation process, it’s time to activate the theme.
The free themes are enough to be successful in blogging; many bloggers have done it.
If you are yet unsatisfied and want to do the perfect theme part, you can buy premium themes from sites such as StudioPress, Elegant Themes, Thrive Themes, etc.
Right now, we have successfully activated the theme.
Congrats! You’re really close to creating a monetized blog.
Step 5: Customize and Optimize your Blog
Now that you have reached the bit technical and final setup part of your blog.
It’s time to dig deeper.
The theme is considered an essential foundation for the design of your blog, but there are far more things to customize your blog. WordPress plugins add further functionality to your blog to take your blogging to the next level!
There are a variety of plugins, but for now, we’ll stick to the one best plugin to increase our blog’s features, too many plugins slow down your site.
Plugins serve distinct purposes: creating a contact form, performing backups, adding social media buttons, increasing site security, or other essential aspects to make your blog search engine friendly.
To acquire free plugins, you need to go to that “customize” option on your theme.
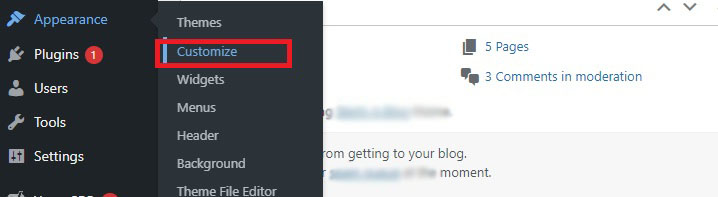
The sidebar’s menu option will be different by the different themes. To edit, click on “site identity.”
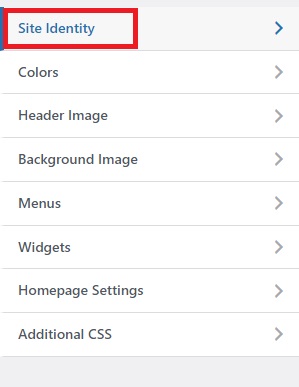
You may add your blog’s title (name) and tagline if you want. When done, click on the “Save and Publish” button.
Optimizing for Search Engine Traffic:
What is SEO?
Does something too technical or creepy spark into your mind? The word SEO sounds exceptionally typical to many people, and they keep on asking a repeated question, what is SEO exactly?
Search Engine Optimization, aka SEO, is a process of optimizing your blog or piece of content to rank on Google for target keywords. Put simply? SEO optimization helps your content rank or appear higher on Google’s search results.
Don’t worry! You don’t need to learn SEO from scratch; your WordPress system will take care of it and help you attain organic ranking.
Some folks consider SEO, stuffing keywords insanely everywhere on your blog to rank on google- it’s a myth. Keywords do play a role but in a natural way. Well, that’s another debate which we’ll discuss later on.
You need to target both the google criteria and human readers’ expectations of content.
How to get your blog’s SEO done apart from well-crafted and engaging content?
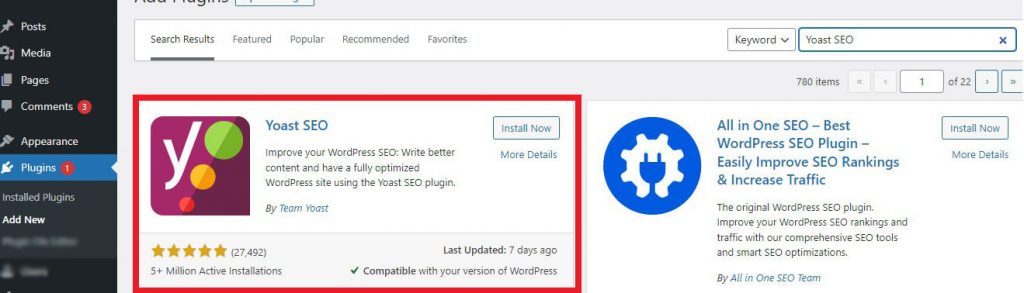
Yoast SEO is the SEO plugin for WordPress. Head to the plugins and click on “Add New” so you may install it.
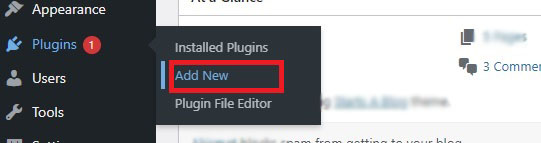
On the next page, click on the search bar and search for “Yoast SEO.” You’ll have the below result.
To install, press the “Install Now” button and activate it after installation. You see, it goes so much simpler than you think. There is a similar pattern of everything; it goes like this: add new -> Install -> activate.
You can see the new SEO option in the sidebar’s menu or the icon at the top. Click on one of these to access the plugin setting.
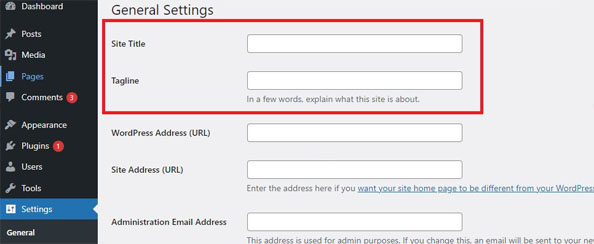
To set the foundation of your blog, go to the setting option and click on the “general.”
In the next step, recheck that your website name and tagline are correct. Furthermore, identify yourself as a company or a person. Click on the “Save Changes” button.
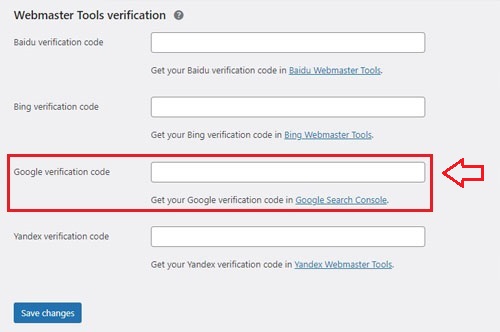
You installed the plugin a bit earlier. Afterward, go to the “Webmaster tools” to get on “Google Search Console.” This Webmaster tool lets you submit your site to their search index and optimize visibility.
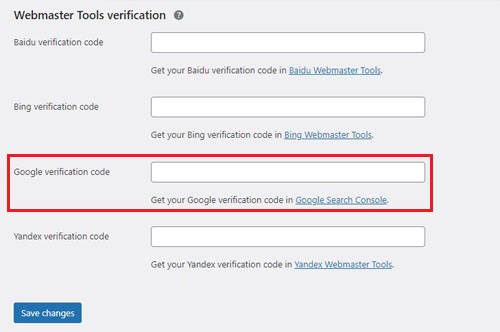
To access Webmaster central, log into your google account through either your Gmail or drive account.
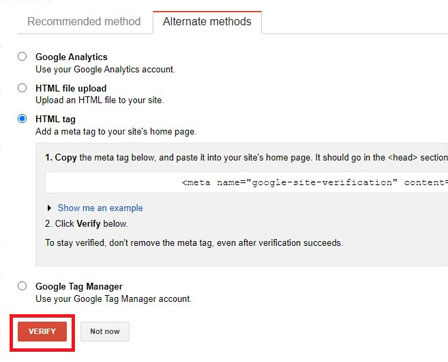
Once you are logged in, you’ll have two methods, click on “alternative methods” and choose the “HTML tag” to add on a Meta tag to your blog’s home page.
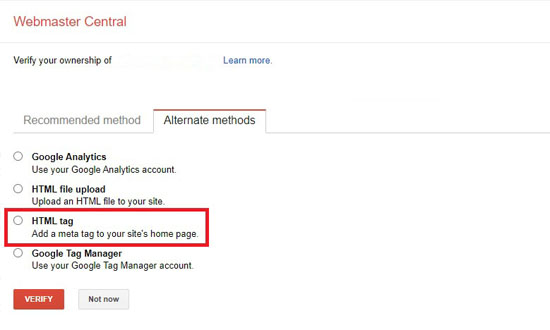
Here, you’ll see a new drop-down with meta code. Copy the alphanumeric string in between quotation marks.
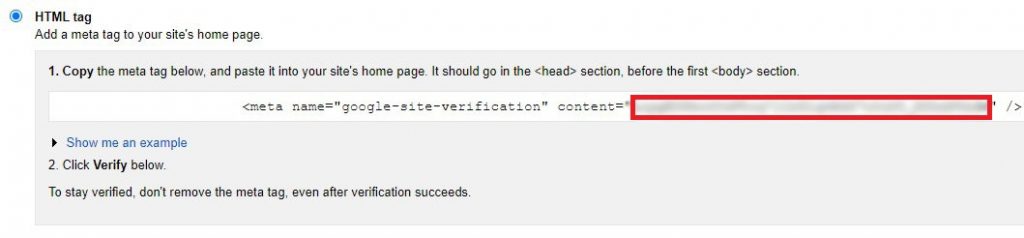
Next, you need to paste it as it is into the Google Search Console text box and save the changes.
Next, hit the “verify” button.
When you look deeper into Webmaster Central, you’ll be shocked to see such mind-blowing data-driven insights. For instance, the target keyword you rank for, and notify Google when you publish a new post. Additionally, point out your blog’s errors.
Furthermore, fling on the “General” tab and where you’ll find a button, “installation wizard,” open it.
Ten Steps to Optimize You WordPress Blog
Now, Yoast provides you with ten easy steps in order to optimize your WordPress blog.
Step 1: Just Skim through this step because it’s a welcome screen.
Step 2: This step has some options to specify the environment of your site. You must choose the “production” tab, so Yoast will know it’s a website run to catch the organic traffic.
Step 3: You’d ask about the website type, choose the “Blog,” and move next.
Step 4: Next appears an option you’ve already chosen, so move towards next quickly.
Step 5: You can add any social site that links with your blog and then rush towards the next step.
Step 6: The Yoast’ll present you with the post visibility page. The default settings are fine to use. Let the first two options stand visible and the last one hidden.
Step 7: You can choose whether you will write the content yourself for your blog or hire someone good at it. You’d better be a solo author at the start, but if you want, you can choose the other option. You can also change this setting afterwards.
Step 8: This step will be for those who want the Yoast SEO plugin to get your Google Search Console information.
- Now, click on the “Google authorization code” to get the code.
- A screen appears, and Yoast SEO asks permission to access your blog’s search console data.
- Click on the “Allow” button.
Step 9: You’ll have the title’s setting where you verify your website name and select the title separator.
- This title separator serves as a separator between the title of your blog post and the website’s name in the meta title information.
- Your meta title information looks like this when someone searches your post target keywords: “How to start a blog – startsablog.com.” Click next to proceed further.
At last, in step 10, a congratulations message appears on pulling off your blog’s SEO optimization. Congrats! You’ve completed an essential part.
I hope you are following the tutorial and the thrill of having your own income stream. Congrats!
XML Sitemaps
An XML sitemap is one top-notch feature of the Yoast SEO plugin that will add worth to your blog. An XML sitemap is essential for WordPress sites for indexing.
XML sitemaps notify Google and other search engines about your new posts. Thanks to Yoast SEO for having a built-in feature to update your sitemap automatically. You can activate it and stop worrying about daily manual submissions.
Go to the “Features” tab, and then the “Advance setting pages” option and set it to “Enabled,” and click “save changes.”
In the sidebar, under the SEO, you’ll see the new group of menus. Select the “XML sitemaps.”
In the “User sitemap” tap, set the “author/ user sitemap” to “Enabled” and save the changes.
In all these settings, you can make any change anytime. So far, we have covered the essential setup.
Organize your permalink
Static hyperlink aka permalink serves you to reach a particular page or blog post. WordPress automatically generates a permalink by default when you create a post, with the post ID number coming after your domain.
The problem is that the permalink “/p=1213” looks filthy and irrelevant to your post while providing no clue about the post.
You can fix it through the following simple steps.
Go to the sidebar, hover over the “Settings,” and click on “Permalinks.”
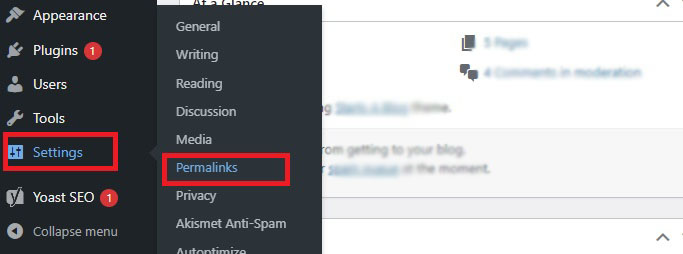
On the next screen comes the multiple options to customize your permalink structure. We recommend you choose “post name” Yoast takes the keywords from your post’s title to create an instructive permalink.
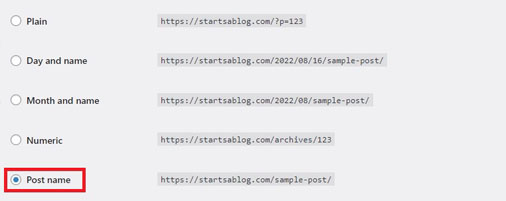
Once you’re done, save the changes.
Finally, you’re on track and have a live blog on Google. We are done with getting a web hosting and domain name, setting up WordPress, designing (installing theme), and customizing and optimizing (setting up Yoast SEO plugin) your blog.
Step 6: Write & Publish your First Article
Are you worried about why your audience doesn’t admire your blog post?
Let me tell you, why? You haven’t created any of them!
It’s time to start a blog and ace your blogging to earn passively!
Once you’re finished with the fundamentals to start the blog, which is, creating a blog.
So far so good! You must be looking forward to what to write for your blog, right?
Content Ought to be on Your Blog
Primarily, your website needs two types of content: static and dynamic. Before starting proper blogging, you’re required to create the necessary pages to start a blog.
WordPress blogging software is designed to allow users to build content either in pages or posts.
1- Static pages (Necessary Content)
Static pages are what most web sites have in common. These pages are located in your blog’s header; you can add more than below according to your blog’s need or specification. For instance, an online store’s blog would need a product page.
- Homepage:
The homepage is an introductory page of your blog, which should be eye-grabbing. When the user enters your domain name into the browser’s address bar, they will be taken to your homepage, which you’ll draw up with your latest and best content.
- About Us:
This traditional page tells the reader about your website and brand, including a bio and the company’s mission. Think of the list of questions: how does your interest develop? Who are you? Build authority! & what’s your goal?
- Contact Us
Contact us is an essential page that builds the credibility of the blog. The “Contact Us” page allows the user to communicate with the website administrator. It includes the author’s email address, links to your social sites, and a contact form.
How to create a new WordPress page?
First, head to the WordPress dashboard login area and enter your user credentials to log in.
Hover over the “pages” option in the left sidebar and click “Add New.”
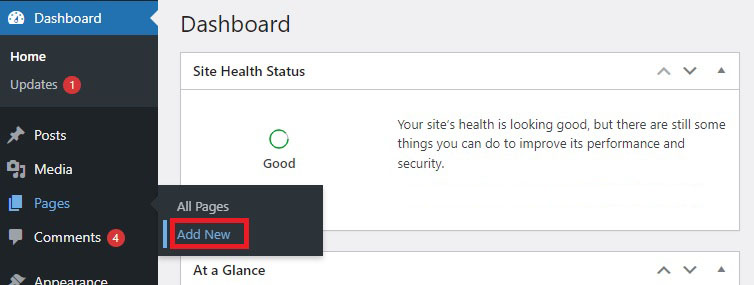
Dashboard -> Pages -> Add New.
You’ll be greeted with the WordPress text editor. Now, you can easily create your key pages.
2- Dynamic Content (blogs article)
Dynamic content is the blog post. Your content plays a vital role in ranking your site. Blog Posts are the articles you provide to your audience through guides, tips, experiences, and stories. In this manner, you build your audience and bring them back for more valuable content.
Are you ready to write your first blog post?
You must be! That’s what you’re here for.
The process of creating a blog post is quite the same as creating a page, but blog posts require a bit of in-depth work to stand out.
WordPress possesses an inbuilt editor for writing and formatting the content; you can create a blog post directly from the WordPress admin dashboard.
Without further ado, let’s create your first masterpiece.
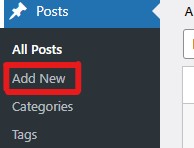
Add New Post
Drive to the left sidebar and select the “Post” button.
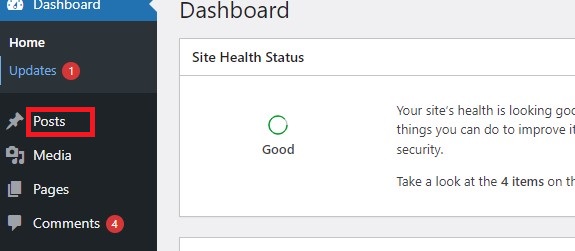
Press the “Add New” tap to begin creating a new post.
This must be your first experience writing a post on WordPress. Don’t worry; I’ll guide you throughout the process, from the blank post editor screen to the entire organized content.
Now you’re on the editor screen.
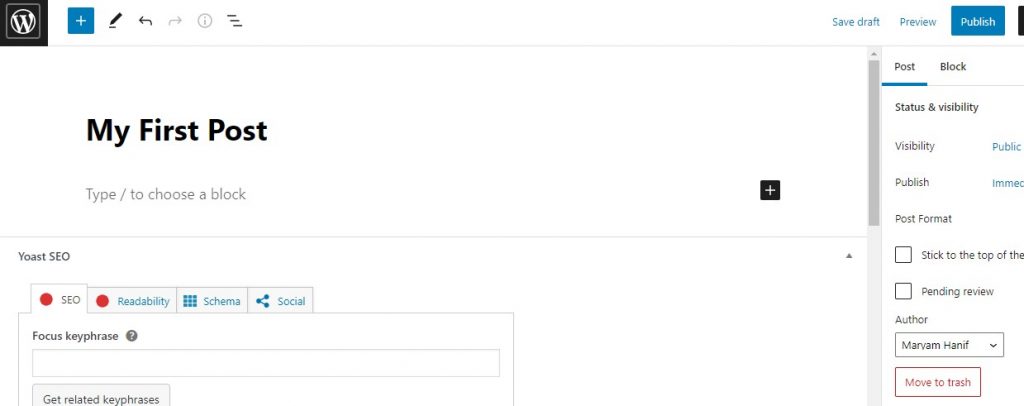
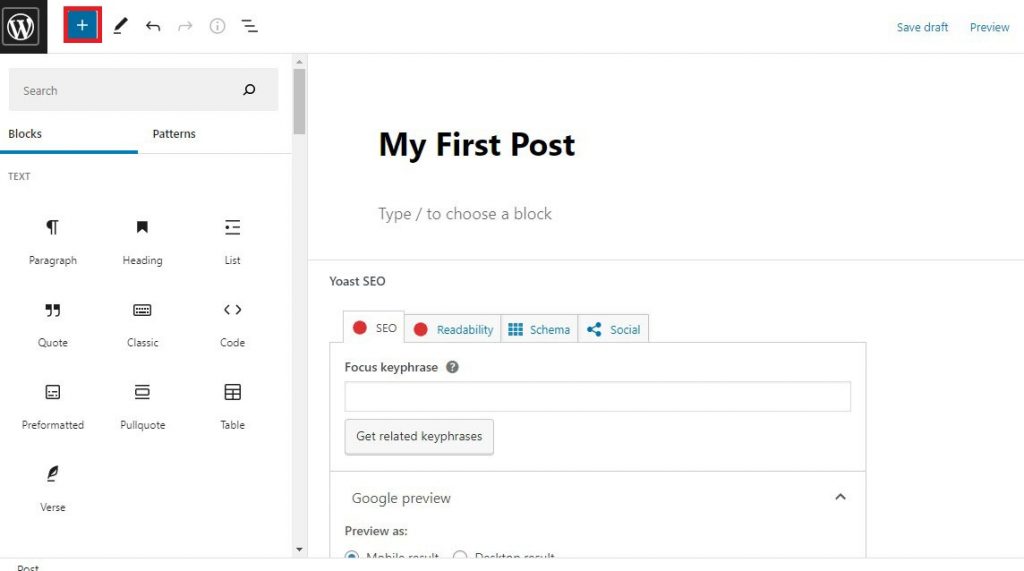
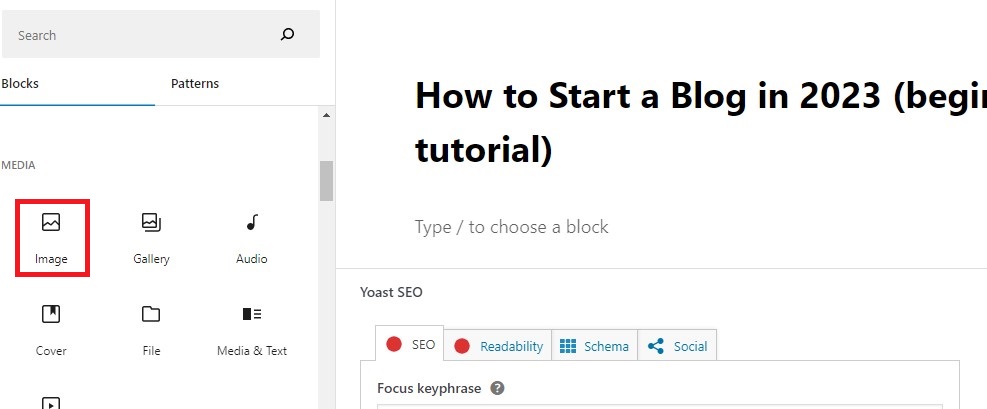
Click on the “+” option at the top to see the WordPress blocks. The blocks include numerous text formats, media, tags, design elements, web widgets, and loads of features to apply to your blog.
In the first place, enter the title of your post, which you’ve already decided to launch as your first blog post, and then start writing your blog post in the bottom box.
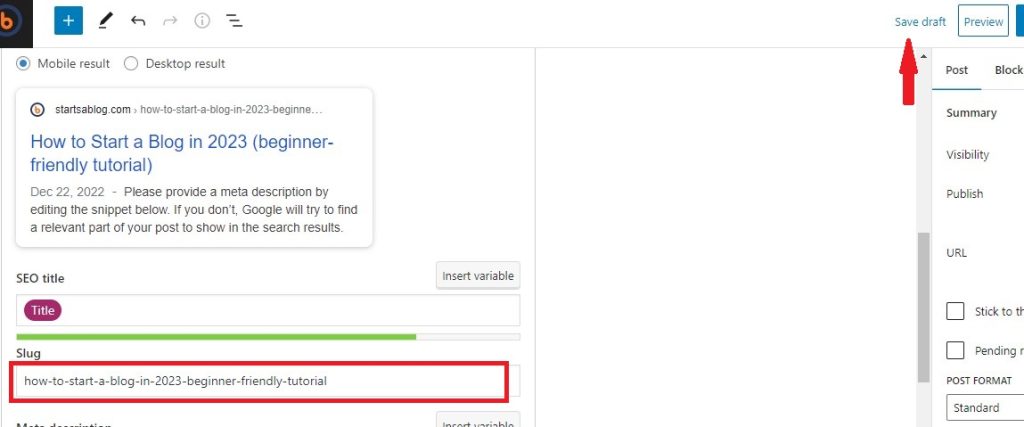
When you stop writing and save the post as a draft, WordPress will create a permalink for your blog, driven by your title.
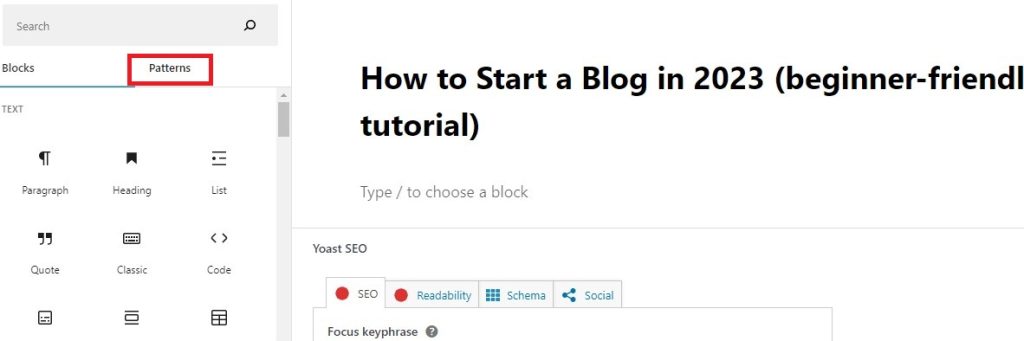
Select Pattern(if you want)
You can also use the feature of a predesigned template for your blog post. There is a “Patterns” tab next to blocks; check it out!
Readers don’t want to read just a plain post. Your motive should be to create admiringly engaging and highly informative content. Visual assets spice up your post and build engagement. You can add the images to engage readers as images help simplify things better than words. If you want to include the image, place your text cursor at the place you want your image to appear. Hit the blue + sign and choose the “image” icon.
Now, you need to click the “upload” button and pick the image from your media library if it has been uploaded to your site.
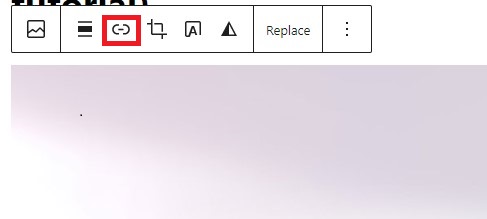
After the upload, you can resize the image depending on what best suits your blog. Moreover, there is an option to add a link at the top of the image below.
There is no further action to add an image. Your image gets automatically inserted into your post.
Once you’re done with writing the article, you need to make a few last steps to optimize your content through the Yoast SEO plugin.
For optimization, the Yoast SEO plugin has a post setting that could be at the bottom of the post text area.
You’re required to edit snippets including “SEO title,” “meta description,” “slug,” and “focus keywords.”
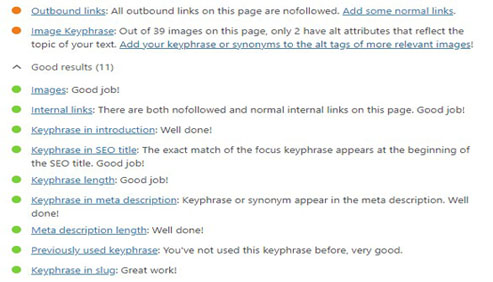
Yoast Feedback
You need to create a catchy & snappy title that attracts traffic and a well-crafted meta description that concise your post-mission. The Yoast SEO plugin also gives real-time feedback on your title and description.
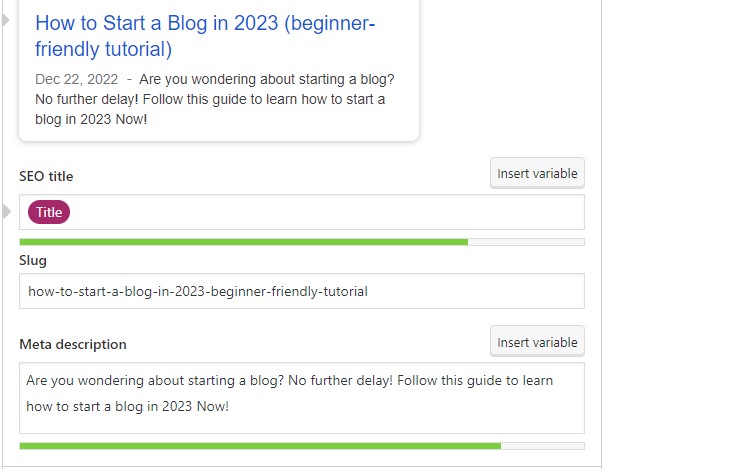
You intend to focus on green balls. Don’t stress over a total score; keep your score up to 80% for better optimization. If you’re able to score 80% and more, you’re up to attract a click.
On completing it, you can preview it to ensure it looks just how to want it. Take your time because it appears in Google’s search engine result, thou, your first impression.

You can publish your post through the “Publish” option at the top. Proofread your article thoroughly and make sure that it looks perfect for publishing.
Congrats! You finally own your blog and are on track to become a next-level blogger.
How to Write an Excellent Blog Post
I assume that you’re pretty new to the “blogging” world, and there is a lot to learn to run a blog.
Do you know that the number of bloggers has increased by 10 million in the U.S from 2014 to 2020?
What’s the reason for this immense popularity of blogging?
First thing first, blogging is passive income.
Many bloggers presume the glamor of passive income, but let me tell you one thing,
There is no easy money!
You need rigorous efforts to pull this off. To provide an effective solution, you must do in-depth research and learn the nuts and bolts of writing your content to marketing strategies.
Your task is to deliver an engaging and easy solution for the search query to rank higher than your competitor.
Being a blogger, your target is to be visible on Google’s first page from your great content. How do you know what makes great content?
Below are the factors to consider while working on your content:
- Brand Voice
Brand voice makes your reader distinguish you. You must attain a distinct voice that makes the audience notice you; remember that your tone should reflect your brand.
You can consider your most ranked content to answer your brand voice question. Put simply? Create more value-adding content like that.
- Headline or Title
You need to come up with a top-notch headline to attract clicks. Once you’re sure about your title, you’d better learn how to structure it.
Take inspiration from other good blogs and create a master list of some questions to create your own concise and attractive headline.
Why is capitalizing the first letter of every word necessary? Should I include the parentheses in my headline?
A helpful tool can help you create a compelling headline; check it out! Coschedule.
- Compelling Introductory Paragraph of your blog post
A blog post should start with an introduction with explicit language. It helps Google to understand what your blog is all about.
Remember that you must impress the human reader and Google’s search engine in a couple of sentences. It should carry a hook and clear direction of what you’re talking about.
For instance, if your blog post is about “how to start a blog and make money blogging,” you need to start like a pro.
Start with a clear introduction to tickle google about what you’re talking about.
In the second paragraph, try to nail the answer and provide a summary of the whole post.
Next, come to the main meat of the article, the necessary in-depth detail your reader should know.
Which should be “on point.”
Otherwise, if you start crafting a story-type thing rather than on-purpose, Google may not understand your post domain, and you’d end up getting no attention from Google and readers.
- Longer Content Ranks Higher
Remember what you’re doing? You are a blogger helping the world; you’re doing something significant.
You must be thinking, why does longer content do better in the ranking? Longer content is far more comprehensive. Blog posts over 3000+ words achieve better results.
- Use Reddit and Quora to understand your audience query better.
- Check out your competitor and find what misses there so you can add it to your blog post so your reader doesn’t get onto other websites.
- Do keyword research to target your audience. Use (ubersuggest) & (answerthepublic) and (Google related Search) to find your LSI.
- Original Content
The content of your blog post should be 100% original and of high quality. You should thoroughly research the topic, get an idea and write your own words based on your understanding.
If you do a copy-paste, you’d have to face the consequences.
- Use Headings, Subheadings, and Bullet Points
Mostly, people skim through the content before reading it; to get an overview of what value the content offers. I’d better break the post nicely into subheadings.
Headings, subheadings or Detailed subpoints, and lists of important information make your content readable. It would help if you made things beginners friendly.
Give your content an excellent visual that lets readers get the information quickly and find their desired information faster.
Read more: WordPress Heading Tags: How and Why to Use Them
- Original Photos and Videos
Images and graphics make content engaging. It also proved beneficial, especially when you’re writing a “how-to” kind of blog post.
A blogger needs to spark a relationship with the reader. Adding video content is ideal for that purpose.
If you want to attach some impressive images, you can buy stock images from sites such as iStock and Shutterstock. To access free visual assets, you can also use some free resources, pixabay, and unsplash.
- Grammatical Correct Content
Your blog needs authoritative content. Unnecessary grammatical mistakes, typos, and poorly written content can make you sound like an amateur.
Your audience needs a hook and valuable info to stay with you. Carve out your blog post in such a manner that it looks more compelling.
You need to avoid off-putting information and unnecessary details in your blog post.
Don’t forget the most crucial step is proofreading. Check all the spellings and punctuations.
Take notice of each little detail that may sound awkward, wordy, and fragment.
Take advantage of some editing apps and ask your writer circle to help you to build organized content.
Step 7: Monetize Your Blog
Monetization is an essential and the last step of blogging. In the short run, you need to build an audience from your up-to-date blog posts.
Furthermore, get the audience involved with your blog through email newsletters, comments interactions, and social media profiles for more traffic.
Once your blog starts attracting the right number of viewers, monetizing it would be better.
According to an estimation, when your blog starts getting 5 to 10 thousand viewers monthly, you can monetize your blog.
Use these 6 Powerful Strategies to Increase Blog Traffic.
Here’s a tip; do you ever think some types of content are more effective in making money?
Here’s a list of this content:
- Listicles, for instance, ” Top 13 blogging topic ideas that generate passive income.”
- Guides, preferably “how-to” guides
- Product comparisons
- Product reviews posts
There are numbers of the method to monetize your blog. In this post, I’ll focus on the most popular ways: affiliate marketing, paid ads, and promotion content.
Affiliate Marketing
In the affiliate marketing method, you become a brand’s affiliate and put affiliate links on your website. Brand affiliates earn a commission when a blog visitor buys something via your link.
The commission rate you’re likely to earn from affiliate programs is about 5-30% of the product’s sales price.
Things to consider to become a brand affiliate?
- It would help if you built the authority to make people click on the link.
- The more viewership you have, the more possible chances of affiliate sales.
- One way to build trustworthiness is to mention on your “Terms of Use” that you use affiliate links to generate revenue which helps you create more valuable content.
Where to get your Affiliate program?
There are many platforms offering affiliate programs in which Amazon is the most significant worldwide platform that offers affiliate programs.
You can check the commission rate Amazon currently offers for different categories, Here!
Advertisement on the Blog
When you have a popular blog, you can run paid ads on your blog. One of the best ways to go is through Google AdSense.
What is nice is that Google AdSense will find an advertiser for you, and you only need to place the Google AdSense code on your blog to let ads run.
You can post ads relevant to your niche on your blog and ads that better serve your advertiser’s purposes.
Sell Services
You must create a relationship with your audience when you get onto blogging.
For Example, you can interact with your audience through comments. Ask your audience what your target audience is looking for? Tell them you’d love to discuss and make things easier for them to build trustworthiness.
Don’t forget to read these amazing ways to Get More Comments on Your New Blog.
You can also link with your audience through emails; what is your audience most interested in? What content offers them value? Collect some valuable information through the email survey form.
Your audience would love to gain the advantage of your expert skills through paid courses, eBooks, and whatnot.
Conclusion
Congrats! You have started a blog and got over the initial hurdles. Starting a blog is not complicated but making it money-blogging is.
You need to be committed to your blog. You must create a calendar scheduled for your blog post and at least publish one blog post per week to ensure your audience remains engaged.
I assume you start blogging to make money, but this should not be your first concern; there’s a whole process, and you need to be patient.
You must follow my guide, practice, and let things work for you, leading you to generate excellent revenue.
This guide will go through each detail you need to start a blog.. Make a blog with Hostinger $3.99/month plan with a free domain.
Get Domain & Hosting from Hostinger!
I hope this guide helps you throughout the process!
If you need help, comment below; I’d love to help!
If you still haven’t created your blog, just wing it.
FAQs – How to Start a Blog
What is a Blog?
The blog, short form of a weblog, is a website that intends to focus on written content. In blogs, a person shares his experiences, thoughts, ideas, and perspectives on a niche.
A blog is a website where fresh content is frequently published.
A blog is a website, whereas not every website is a blog. The website can be one page, but a blog comprises different pages, posts, and where the posts are in volume.
The blog contains well-crafted and engaging articles to attract readers, primarily written in an informal conversationalist voice.
There’s a section of comments at the blog’s end where the reader connect with the blogger and shows the up-to-date and direct connection between the visitor and blogger.
How to create a successful blog?
There are multiple factors, of which the most significant is practice. Your passion and will to learn new things is the essence of starting a blog. You need consistency, spice of creativity, knowledge, and your capability to offer your audience a valuable-content.
Stay consistent and committed to your passion. Keep writing, keep learning, and keep engaging with your audience. You need to be an earnest blogger.
Most importantly, focus on creating genuine content, and learn how to market your content, find your brand voice, learn to craft your article nicely; all the things are covered in more detail above (link to “How to Write An Excellent Blog Post.”)
How much money is required to start a blog or to get web hosting?
You can start a blog for zero through free platforms.
If you are up for serious blogging, you need to go for a blog hosting company that gives you the complete control of your blog.
Hostinger offers web hosting for blogs with a free domain name at around $3.99/month, so the total amount for a year would be just $49.88.
Which site is best to start a blog?
I’ll show you to create your blog in a beginner-friendly manner by hosting (Web Hosting) and WordPress (blogging software).
What is the preferred time to monetize your blog?
For monetizing your blog, you need to bring about 5 to 10 thousand viewership’s in a month.
Does a website get traffic from blog posts only?
Your blog can get readerships from blog posts, email newsletters, interaction in the comments, and social media profiles.
How to optimize your blog’s SEO?
In WordPress blogging software, there are multiple plugins, in which Yoast is reputable for taking care of your blog’s SEO. You must set up Google Search Console and Webmaster Tool, set up your XML sitemap, and organize your permalink.